


By Stephen T. Sinatra, M.D., F.A.C.C., F.A.C.N., C.N.S., C.B.T.
For a while now, probiotics have been gaining in popularity as a way to support gut health. I’m a big believer in them, too. In addition to improving digestion, probiotics are a great way to help boost mood and immune health and to fight inflammation, the Number One enemy of wellness.
One way to take advantage of probiotics is with specially formulated nutritional supplements. But another is with fermented food (also called probiotic foods).
What Probiotic Foods Are and How They Feed the Gut
Foods ferment when the naturally occurring bacteria in them are allowed to break down the naturally occurring sugars in them. This process changes the basic chemistry of a food.
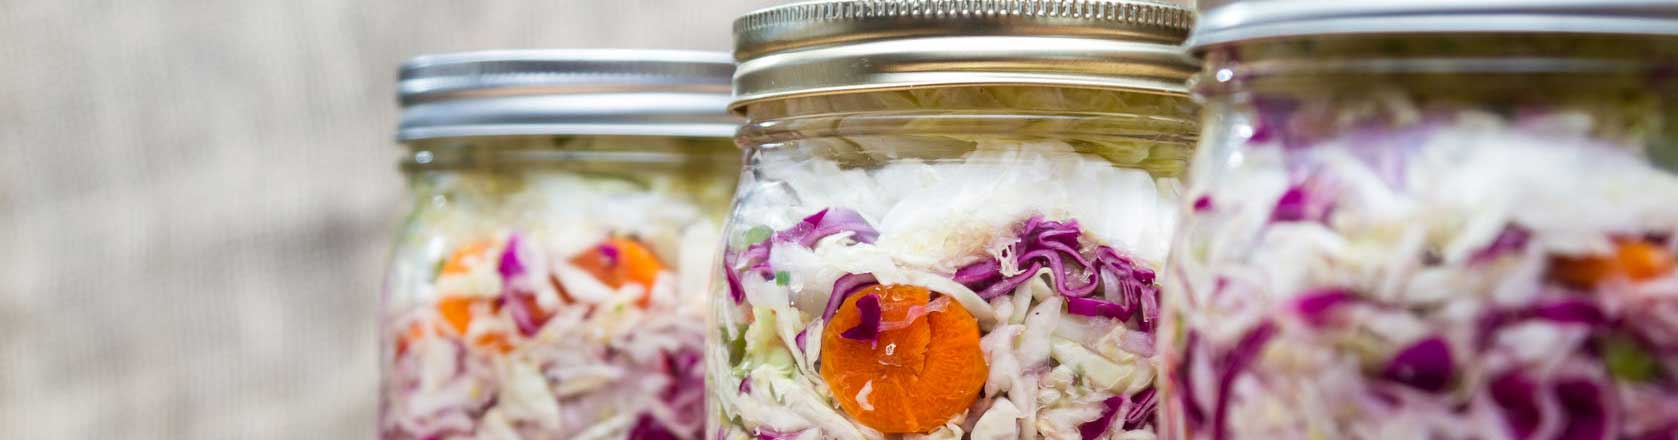
Traditionally, fermenting (or “pickling”) was done to help preserve foods, to keep them edible longer. Foods—often vegetables—were submerged and then sealed in a saltwater brine. With time, bacteria began to multiply and break down the sugars. This process produced lactic acid, which helped preserve the vegetables and lend a tangy “bite” to their flavor.
In some cases, fermentation can even create a new food altogether. Fermented cabbage, for example, produces sauerkraut. Wine is the result of fermenting grapes; the fermentation process is what creates alcohol.
Now, as much as I’d love to tell you that wine is good for digestion, the truth is I can’t. For digestive support, you want to focus on fermented foods that are rich in lactic acid.
Lactic acid is one of the healthiest substances produced by the good bacteria in the GI tract. Eating foods rich in lactic acid not only boosts the amount of it in your system, but it also adds millions more healthy bacteria to your digestive system.
What You Need to Make Fermented (Probiotic) Foods
You can buy fermented foods at the store, but making your own is a much healthier option. Many grocery store products that claim to include live bacteria, such as yogurt, may not actually have as many of the healthy bugs as you think, thanks to pasteurization requirements. Plus, a lot of supermarket yogurts are loaded with sugar.
Fortunately, making fermented foods is easier than you may think. Here are a few things you’ll need to get started:
- Mason jars (with rings and lids) or a fermentation crock. For most people, a wide-mouthed mason jar or two will do just fine. Ceramic fermentation crocks are available if you want to process a large amount of food all at once. You’ll want to avoid fermenting food in any type of plastic container, however, because chemical residues from the plastic could leach into the food.
- Heavy pot with lid or Dutch oven. You’ll need one of these for making yogurt, which you can’t do in a mason jar.
- Sea salt, whey, or a fermentation culture starter. Which one you use will depend on what you’re fermenting, the recipe you choose, as well as the amount of control you want over the fermentation process. If you use just salt, you have to rely more on the natural bacteria in the food to get the process started, whereas a starter mix increases the amount of bacteria right off the bat. A starter mix can speed up the process and potentially reduce the possibility of a batch going bad, because bad bacteria grew faster than the good bacteria.
- Glass fermentation weight. Fermentation occurs in an anaerobic environment, which means the food you’re fermenting can’t be exposed to oxygen once the process begins. Adding a sterilized glass weight to the top of your food mixture can help make sure that the food always remains fully submerged in the brine.
Other Fermentation Tips
As you work, you’ll want to keep all preparation surfaces as clean as possible. This is important because it prevents unwanted bacteria from getting into your fermentation container. Stray bacteria can cause mold and other unwanted bacteria to grow, which will result in rotten—not fermented—food.
I would also try to buy the freshest possible vegetables (organic if you can afford them, especially if you’re fermenting a food that’s high on the EWG’s Dirty Dozen Foods List). As far as water goes, avoid tap water if you can. Most tap water is treated with bacteria-killing chemicals, which could prevent the good bacteria in your fermentation container from taking hold.
Probiotic Beverages
If you’d rather drink your probiotics, try kombucha. You can find it in most grocery stores, and it’s relatively easy to make your own at home. There are numerous DIY kits available (my daughter has one from The Kombucha Shop that she swears by) that will gives you the “scoby” needed for the fermentation process, as well as a brewing apparatus. I love kombucha because it’s made with green or black tea, which is high in health-promoting polyphenols. And while kombucha is made with granulated sugar (which I try to avoid whenever possible), most of that sugar is consumed by the scoby as part of the fermentation process; the resulting beverage is probiotic-rich and packed with antioxidants.
Start With These Popular (and Easy) Fermented Food Recipe
A quick Google search of “fermented food recipes” will produce hundreds of options you can try. Let your taste be your guide, and choose what sounds good. But here’s a recipe for one of the classics in the probiotic food world—yogurt.
Homemade Yogurt
- 4 c. organic milk
- 3 T. plain organic yogurt (purchased or homemade) or powdered yogurt starter (follow package instructions)
- If using store-bought yogurt, choose an unsweetened version that contains live cultures
- Flavorings such as raw honey, fresh or dried fruit, garlic, or herbs (optional)
Prepare an ice bath, filling a large bowl or sink with ice. In a large, heavy pot heat the milk until it reaches at least 180°F (you can determine this by using a candy thermometer) or boils, stirring occasionally to prevent a skin from forming and prevent scalding. Remove the milk from the heat and allow it to cool to 110°–115°F. To speed cooling, place the pot in the prepared ice bath, stirring the milk occasionally. (If the milk temperature drops too low, return it to the heat.)
If using yogurt as a starter culture: Combine 1 cup warm milk with the yogurt in a small bowl. Add this mixture to the remaining warm milk and stir gently until completely incorporated.
If using a powdered yogurt culture: Follow the instructions on the packet and add the specified amount of powdered culture to the warm milk; whisk gently until completely incorporated.
Pour the yogurt mixture into sterilized containers (mason jars or thermoses), and incubate the mixture for 5 to 10 hours at a temp that is between 110°F and 115°F for 5–10 hours (the amount of time depends on what flavor and consistency you like —a longer incubation period produces thicker, more tart yogurt). Do not disturb the yogurt during incubation. Next, cover the yogurt and refrigerate until cold for 2–3 hours. Stir flavorings into yogurt just before serving. Homemade yogurt will keep in the refrigerator – in covered glass, ceramic, or plastic containers – for up to 2 weeks, but you’ll get the best flavor during the first week. As yogurt ages, it becomes more tart. If the whey (a clear liquid) separates from the yogurt, just mix it up before serving.
See the original recipe on http://www.epicurious.com.
I think you’ll be surprised just how simple fermenting your own foods or beverages can be. Give it a try, and add a serving of them to your daily meals. Better health is sure to follow.
For more in depth information about gut health and fermented food recipes, check out my e-Book: Simple Ways to Improve Gut Health and Why It Matters!
© Stephen Sinatra, MD. All rights reserved.
GHBFVSMM194018577